Pages

Sunday, 6 January 2019

More Christmas Cards

Ok so yes, I know it's now the 6th January and we are all taking our decorations down, but I inadvertently got so excited I gave these Christmas cards to the recipients without taking pictures of them. So I had to get my brother to take pictures of his and I took a picture of Mum's at hers when I visited for New Years. So excuse the fact they aren't the best pictures ever but I still wanted to show you them

My brother's one is below. I cut 4 pieces of black card and 4 pieces of music themed paper and rounded 2 of the corners on each piece.

I used my Stampin Up festive flurry stamp and die set again and got the gilding flakes out again as I love them so much.

I cut out a snowflake from gold card to go behind the gilded snowflake to make the image pop. I also stamped and gilded the sentiment too, which actually worked and it came out clear so it can still be read. Here is a picture of the sparkle in the flakes

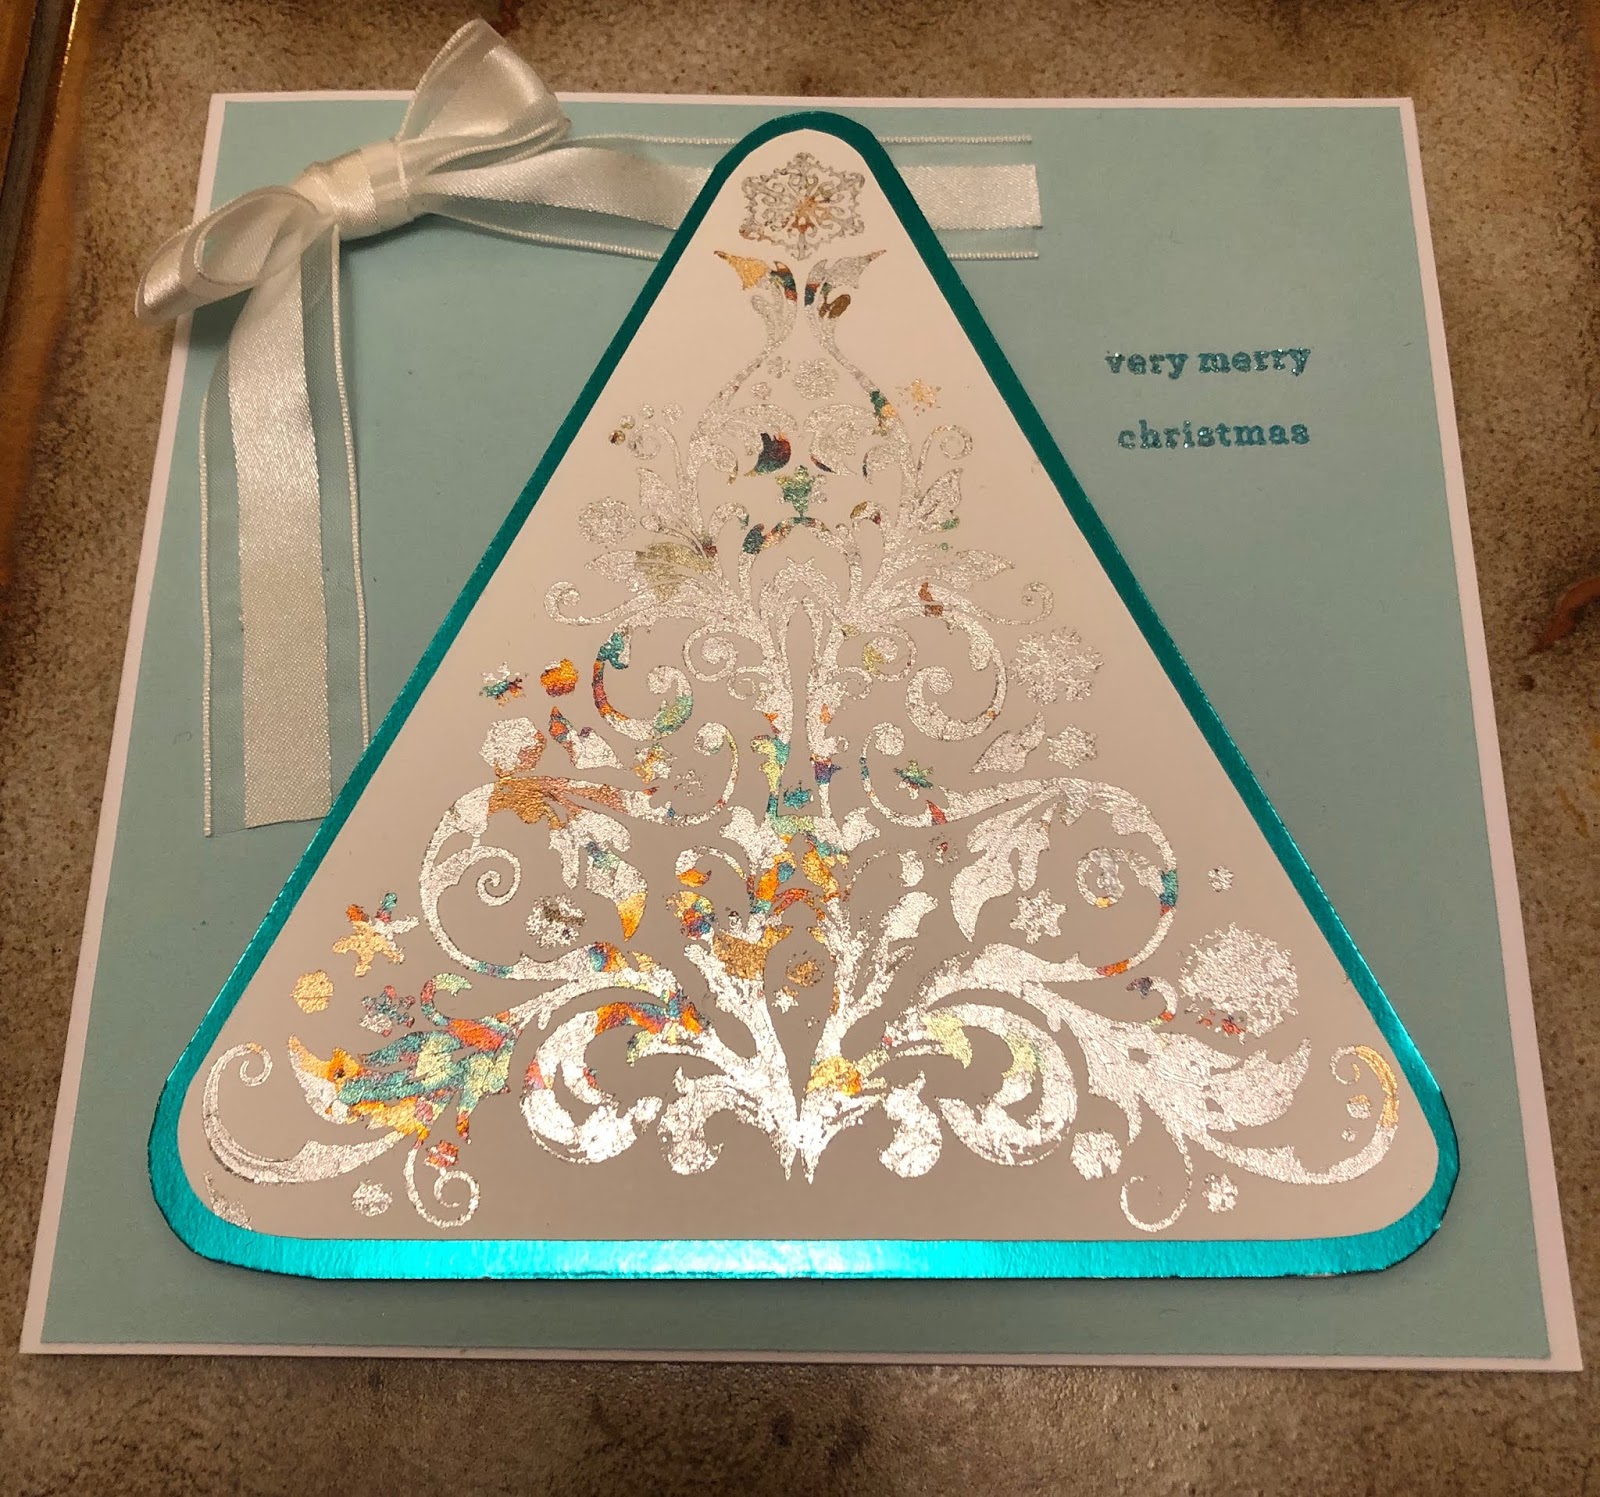
The card below was for my Mum - again with the gilding flakes and Indigo Blu Baroque Christmas tree stamp.

I wasn't too sure how to cut this out so I opted for a triangle and mounted it onto some turquoise mirror card. I didn't want to add too much more decoration that would take away from the main tree so I just added a stain ribbon and a small heat embossed sentiment. I wasn't too sure about it but Mum loved it and that's what counts
Claire x


Monday, 31 December 2018

Bendy Spine Mini Book

Another day, another mini book created. This time I was inspired by some white metallic paint (it doesn't take much to inspire me at the moment). I painted the covers of this mini book, first with white and then with the metallic white and sat back to think about what next.

This is the finished book:

I wanted something elegant so I loaded up my script stamp with gold paint and stamped the covers and the spine


I had a napkin with a variety of black script on it so I tore it down to the last layer, tore the parts off that I wanted and adhered it to the covers with some matt finish modge podge (I love modge podge!)

I wanted some bolder black on the cover too so I stamped a variety of my postcard stamps with black Stayzon.

I then painted the edges of the book with a very fine paintbrush and some of the gold paint

For the pages, I used the Tando Creative innies pack and cut 8 strips using the larger template. I rounded the edges with a punch to give an even finish. I wasn't sure what I wanted in the book yet so I have left them blank.


I used some thick black cotton to wind along the spine and slip the pages in between, so they can be taken out easily for decorating at a later date. I used some double sided tape to adhere the ends of the cotton to the inside of the spine.

I love this elegant finish to this book and watch this space for what I do with the pages

Claire x


Sunday, 30 December 2018

Dotty the Whimsical Bird

Back to the Tando Creative and this time, Whimsical Birds. These come as a variety of grey board shapes that make bodies, heads, wings, arms, eyes and legs and the possibilities are endless. You can mix and match as you like. Here is my finished bird. I called her Dotty because she is covered in dots and spots

Orange isn't normally a colour that I would go for, but for some reason I was drawn into making an orange bird. I mixed red and yellow acrylic paints together and covered all the shapes, apart from the legs, in orange paint. I then toned it down a bit and made a yellow acrylic wash and painted over the orange. Then I covered some bubble wrap in yellow paint and stamped it all over the bird.

I hand painted orange spots on and then went around the edges of the bird with black dots made with a fineliner. I added the detail for the beak and also outlined the eyes with a thin line of black dots.

For a finishing touch I added glossy accents over the eyes and the legs. Here is a slightly better close up


For the background, I had some mini canvases that I hadn't thought of a use for before so I painted it over in a pale blue crackle paint. I then mixed some green acrylic paint with water and added a wash to the crackle paint, which really helped draw out the cracked effect.
I sealed this with glossy modge podge to stop the cracks from flaking off.


Then I decided I needed some clouds. I found an outline online, traced it onto tissue paper and then modge podged it on. However, the clouds went see through so I had to paint over them with white paint
I wasn't sure what to do at the bottom, but then I found a brick stencil and thought I would make him look like he was sat on a wall. I used texture paste, let it dry and the painted it over with brown acrylic paint

When the bricks dried they look really nice and stone like and full of texture.


I then stuck on Dotty the bird with some acrylic craft glue and she will hang pride of place on the wall in my craft room

Claire x

Saturday, 29 December 2018

Flower Mini Book

A few weeks ago, Tando Creative had these mini books on Hochanda and I knew the minute I saw them that I wanted them! They arrived just before Christmas and I've got so many ideas of how I want to decorate them.

First off though is this mini square book. It is about 2 inches square and has a separate spine that needs to be attached with masking tape, ribbon or material.


Covers -
Firstly I painted the covers with white acrylic to give it a good base. I then painted over this with a pearlescent blue acrylic paint. Then I ran it through the embossing folder, which I probably should have done first because some of the paint flaked off (I did just go over it again though)

Then I painted 2 chipboard flowers in the same shade of blue. I used my versamark pen around the edges and then heat embossed some blueberry powder onto it

For the ribbon, this was seam binding that I had from Stampin' Up. It's a cream colour but I used ink to colour it in pink to go with the theme of the book

I attached the spine on the outside with some pink ribbon I had. For extra security I used masking tape on the inside and painted over it.

The ribbon was attached both back and front with strong tape. Just remember not to pull it too tight around the book as it still needs to open!

Pages -
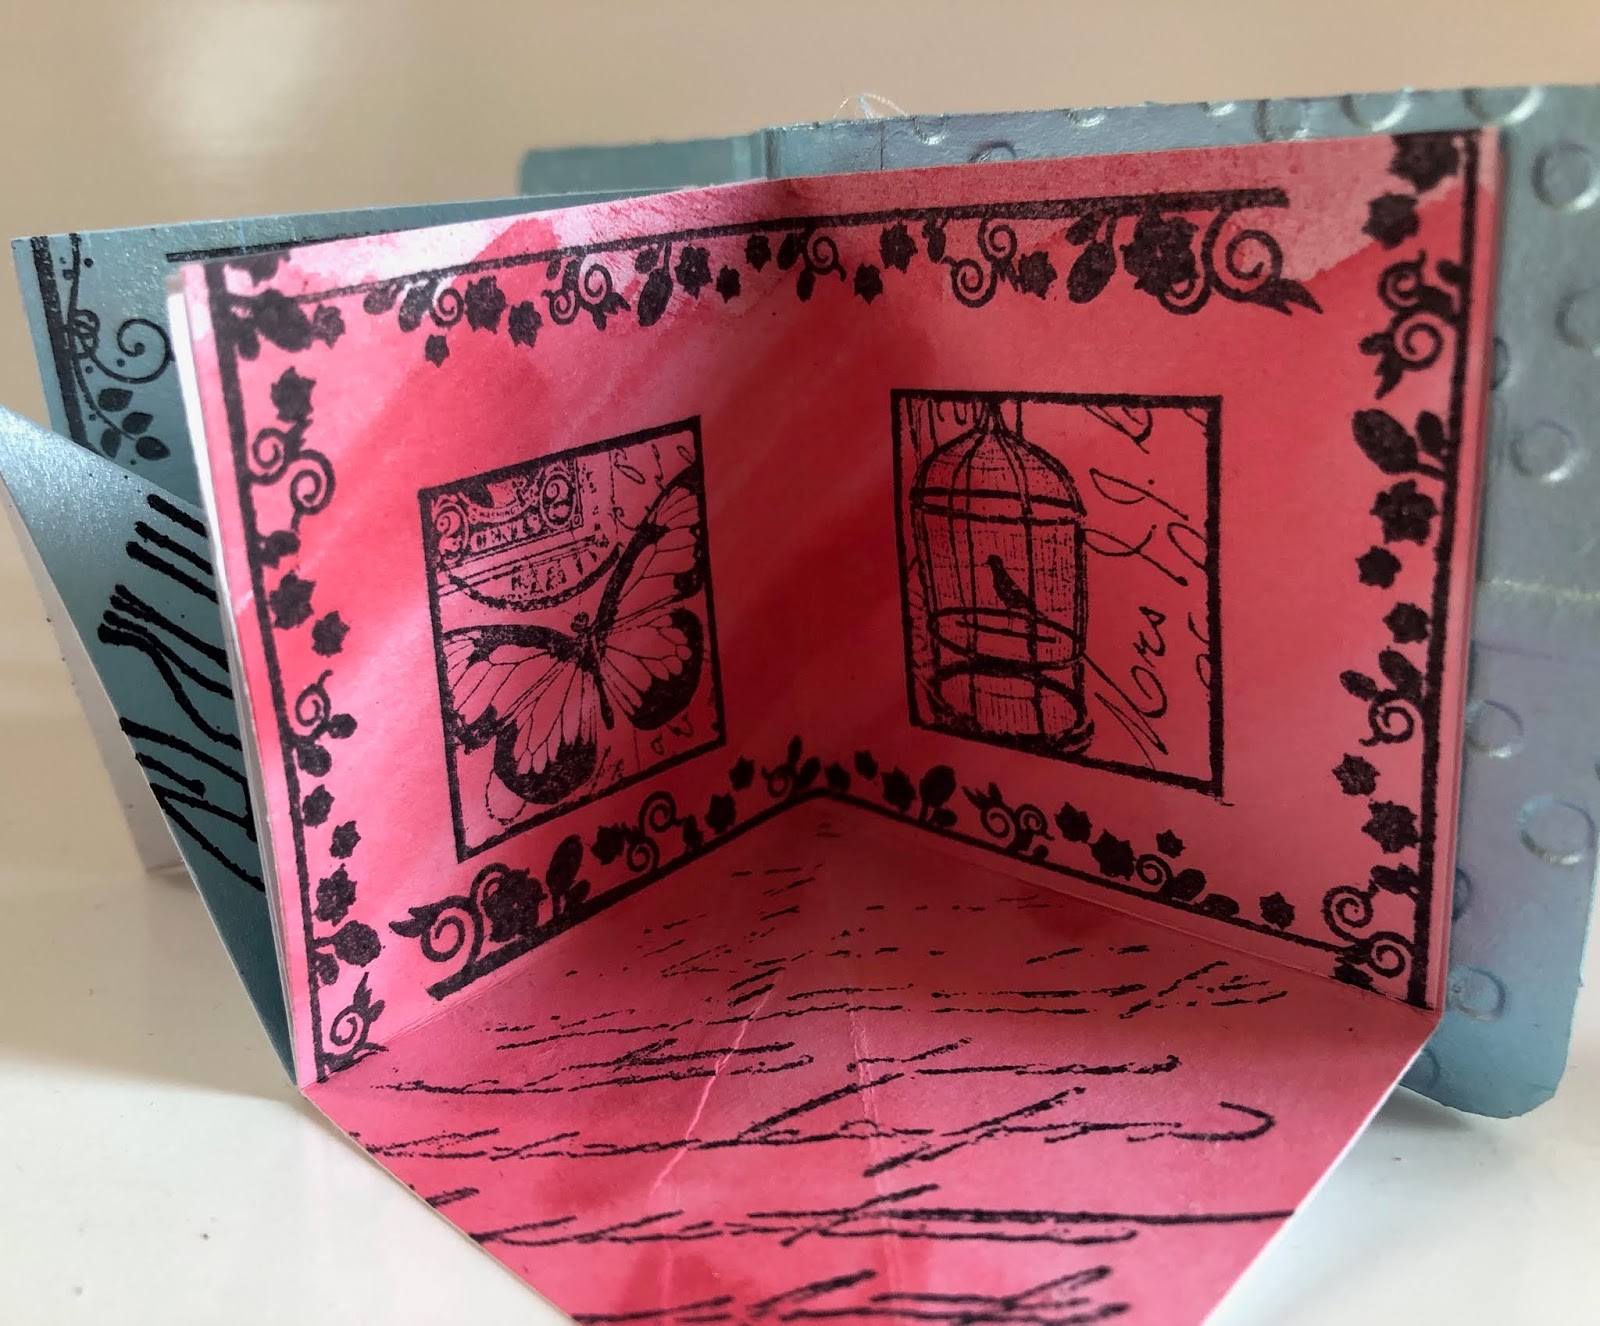
For the pages, I was inspired by a tutorial on the Hochanda show to make a pop out book that looks like the below:


I cut a square of paper that was 4" x 4" and then folded it in half then half again. I used a variety of inks and paints in the blue and pink shades to colour in the pages

I then used my Darkroom Door Garden Inchies stamps on the pages. They were the perfect size to add a stamped border around.

For the bottom page I used a mask and some Crafty Individuals stamps that I had forgotten about

The page below I used the same blue pearl paint mixed with water so it wasn't so thick. I then used WOW! powder in black glint, which gives it a very subtle shine to the images. The images are also much bolder than the ones stamped with regular ink.


Although it's not perfect, I loved making this book and I can't wait to make the other 10 that I have. There is also a little shelf for them all to sit on, which I will have to show you at a later date.

Claire x


Friday, 28 December 2018

2018 Christmas Cards

So, it's been a while and I've not really had the inspiration to make cards for a while. We moved house in August and I've still been trying to find where I had hidden all my crafty bits and pieces. But I decided to root through all my old boxes and I think I also found my inspiration hiding in there

This year I made cards for close friends and family. One of the things I found was the Indigo Blu Flakes and Flitter glu and some of their lovely stamps. First up was this card I made for my boyfriend's mum. Now I can't tell you which of the flakes I used as I bought them over 4 years ago and tipped them into another container. The stamp is Festive Flurry from Stampin' up and is one of my Christmas faves

I used silver flakes for the large snowflake and gold flakes for the smaller snowflake. I then cut a medium snowflake from blue pearl card and used it to show off the colours in the other two images.
The sentiment is stamped and heat embossed with WOW! powder in Ruby Romance.

Now, I love heat embossing and I have far too many of the WOW! powders. And they certainly come out at Christmas. I love the fact you can add sparkle to a card without it going everywhere!

Another Stampin' Up favourite stamp of mine is Snow Day, where you can build a snowman. I made two of these cards this year and embossed them both in different WOW! powders. The first is Blue Blast which is one of my favourites and always comes out at Christmas in one form or another


The background was made using Indigo Blu's snowflakes stamp. It was stamped with Versamark and then I brushed over some blue pigment powder. In the right light it really shimmers

The next one was embossed using Sensational Sage - the pictures do not do this powder justice. It is a green and it has some amazing colours running through it that change colour depending on the light. I tried to capture it as best as I could but it just wasn't working


I did also make some other cards but I forgot to take pictures of them. I've asked the recipients if they can get pictures and then I will show you.

Claire


Sunday, 2 February 2014

Backyard Basics Workshop - the pictures

Yesterday saw my second all day workshop using the Backyard Basics stamp set and some lovely watercolouring techniques.

It also turned a bit messy as we got to grips with 'spritzing' with the aqua brush - there was quite a bit of ink everywhere.

These are the two things we made using this technique, which, once you have the hang of how to get the ink out the brush, is fairly straight forward and effective


These two also use the new scallop tag punch which is in the new Spring/Summer catalogue - and was a very popular item yesterday. It is so easy to make tags with and they can be made any length. We also made the following card and favour box with the tag punch:


One of the other new products we tried out was the flip card die. This was really easy to use and makes lovely cards at the drop of a hat - or a quick run through a big shot machine!

First off we made this simple bird card


And then we elongated the card to create a hidden pocket in the next card. The pocket can be used to put money or a gift card in and sent securely though the post.

We also made a bird flap card with a hidden sentiment inside


And this different take on an easel card:


Then there was this lovely waterfall card which was really easy as it used one of templates that I had - all you need to do is draw round it and cut it out. Simple as that, then you can get on with the decorating of the card.

And this bee card which I had to show you as well. The background was stamped with the bee stamp and embossed using white powder. Then it was coloured over using the aqua brush and daffodil delight ink to create a lovely graduated wash of colour.


The liquid pearls really finished off the card too.

The next workshop is taking place on Saturday 15th March so if you would like any more details then please let me know. I am also working on ideas for downloadable PDF's of workshops which may interest a few of you out there?

Claire

Sunday, 26 January 2014

Stampin Up Occasions Catalogue and Sale-a-bration 2014

Well it's that time of year again - a new catalogue launch with some brilliant new products and the return of the Sale-a-bration promotion with Stampin Up. For every £45 you spend you get to choose a free product from the sale a bration catalogue.

As a demonstrator I was lucky enough to pre order some of the new products and managed to spend so much I think I've ordered all the free products from the Sale-a-bration catalogue!!

I was having a play with the new products today and here is what I made:

This card comes from the Peaceful Petals stamp set (133107) which is one of many flower stamps in the catalogue.


I stamped and embossed the flower in white powder onto vellum and then coloured it in using the strawberry slush ink pad and a blender pen. Here's a close up:


The background paper is part of the sweet sorbet DSP which is offered as a free Sale-a-Bration product (code 133521)

The tag was also created using one of the two new tag punches. I love it - I've been looking for a tag die for ages but this is one step better. As long as the card is 2 inches wide, you can make a tag of any length. The code for this if you would like to order is 133324.

I then made this tag using the same punch and some other lovely paper from the Sweet Sorbet DSP.


The flower and the twine was from the sweet sorbet accessory pack which is offered as a SAB free product. It is a set of various self adhesive cork elements and three colours of twine. (Code 133522)

Another SAB product are these lovely banner stamps and a co-ordinating punch (133554 & 133519). The background paper, which isn't too visible, is part of the Kaleidoscope DSP in the occasions catalogue, which features very vibrant colours. (Code 132995)


Both catalogues go live to order from on Tuesday 28th January and run until March. I will be back again soon with some more previews of products but if you would like me to send you a catalogue then please contact me .

Claire

Sunday, 19 January 2014

Backyard Basics Workshop

On Saturday 1st February I am holding a workshop in which we will be using the Backyard Basics stamp set.

I have made a set of 10 cards and a few projects, utilising some of the sale-a-bration products and some new products from the occasions catalogue, both of which will be available from the 28th January to purchase from.

One of the things I bought was the new tag punch, and it's may favourite. I have been looking for a tag die cutter for a while and when I saw this I had to have it. It cuts tags to any size, they just need to be 2inches wide, and can be used for lots of things, such as these:


We will be making all three of these things in the workshop. If you are interested in learning how to make these then please contact me. I might put some tutorials up on here after the workshop has been completed on the 1st!
 
Claire

Sunday, 5 January 2014

Thank You Cards

It's that time of year when thank you cards come in very handy. I was playing around with my Stampin' Up Flower Shop stamps and came up with three thank you card ideas.

 
 This first one is made simply by stamping the outline flower three times using melon mambo, wisteria wonder and so saffron ink pads and cut out using the co-ordinating punch.

I then cut a strip of yellow from the Polka dot parade paper pack and secured melon mambo taffeta ribbon behind both the ends.

I stamped a thank you sentiment in wisteria wonder ink and cut round it. I mounted it on to the wisteria wonder card and cut round again.

The flowers were stuck to the right hand side using foam pads and finished with a small silver gem in the middle of each. A strip of 5 gem stones were stuck to the ribbon.


This card was made by embossing a piece of wisteria wonder card with the honeycomb embossing folder. I then cut it down to 10x10.5cm and stuck it to the top section of the card. I then cut a piece of pink pirouette card to 4.7x10.5cm and stuck it to the bottom. I covered the join with silver ribbon.

The shabby flower from the set was stamped three times in coastal cabana, so saffron and crisp cantaloupe ink and cut out with co-ordinating punch. They were mounted to the top section of the card using foam pads.

I them stamped the thank you sentiment in coastal cabana ink and cut out as a flag. I then cut out two longer flags from the subtles DSP in so saffron and wisteria wonder. I then finished the card with three co-ordinating candy dots on the bottom right hand side.

 
I really love the gingham garden designer series papers and this card was made using some left over scraps. I cut the red gingham piece to 9.6x14cm and stuck it to the card blank. I then cut a strip of the yellow flower paper, making sure that the flowers were in the middle - this measured 14x1.5 cm.

On the yellow stripy paper I stamped two outline flowers in black ink and one scribble flower in black ink and cut round with the co-ordinating punch. I mounted them on foam pads and them stuck two small blue pearls to the centre of the outline flowers and bright pink pearls to the centre of the scribble flower.

I stamped the sentiment in marina mist ink and cut flags at both ends. This was then stuck to the card with foam pads.

I hope you like the cards and that they give you some ideas for thank you cards of your own. I really like the flower shop stamp set as it's so versatile and with 6 different flowers in it you can never get bored!

If you would like to purchase it then please visit my online shop or contact me for more information.

http://www.stampinup.net/esuite/home/clairewolfe/

Claire

Wednesday, 1 January 2014

Happy New Year and 2014 Calendar Tutorial

Happy New Year everybody. I hope you aren't feeling too bad today and that you all have a very successful 2014.

I thought it was a good time to share with you this calendar I made, actually a few months ago, intended for a workshop but ran out of time. It's really easy to make and can be decorated how you wish.


1) Take an A4 piece of chipboard card and score at 9.8, 19.6 and 29.4 cm

2) Trim the length to 16cm. Using the strip that you have cut off, mark 1.5 cm either side of the score lines and cut, to make two tabs which hold the calendar together.

3) Lay the main piece in front of you with the long part at the top and mark the left section as 1 - the back, 2 - the front and 3 the bottom. This will help you when decorating.

4) Pain the edges of the calendar in white acrylic paint and leave to dry.

5) Stamp 3 sets of 3 flowers using the Flower Shop Stampin Up set in melon mambo, marina mist and so saffron. Cut out and using something soft underneath, such as a mouse mat, rub the surface with an embossing tool to create the 3D effect.

6) Stamp 4 sets of leaves from the Stipple Blossoms Stampin Up set in Pear pizzaz and Wild Wasabi and cut out.

7) Cut paper from the gingham garden paper pack to 15.3 x 9.1 cm. Ink the edges with the melon mambo ink pad and stick to the front and back of the calendar. Cut a strip of pink gingham paper to 15.3 x 2cm and stick to the back section.

8) Layer up the flowers using glue dots and stick the yellow set to the back section. Stick the sets of leaves down to the front and stick the pink and blue flowers over the top.

9) Mount the calendar tab onto marina mist card and stick to the front of the calendar. Finish with small co-ordinating pearls.

10) To assemble the calendar, put double sided tape onto both top and bottom of the tabs and peel off the bottom section. Stick to on side of the calendar, fold the sides in as a triangle, peel off the other double sided tape and stick the calendar together, making sure the two edges join neatly.

Now you have a lovely desk calendar for your crafty space.


Claire x

Sunday, 10 November 2013

Stampin Up Christmas Wreath Class

So, the date has been set for my next class and this one is a morning where you will be able to make your own gorgeous Christmas wreath to display in your home.

The wreaths you will make will vary slightly from the one in the photos below but they will still feature the vintage feel, the snowflakes and the jingle bells, which finish the whole thing off perfectly.


This will be held at my house in Brentwood on Saturday 7th December and will cost £8. It will run from 10am until about 12.30, or when we have finished. Places for this are very limited and will need to be booked in advance so please contact me if you would like to attend.

If you would like to take part in making this wreath but are not local to Brentwood then I can post you the things you will need to make it along with the instructions. If you would like this option then please contact me.

Claire