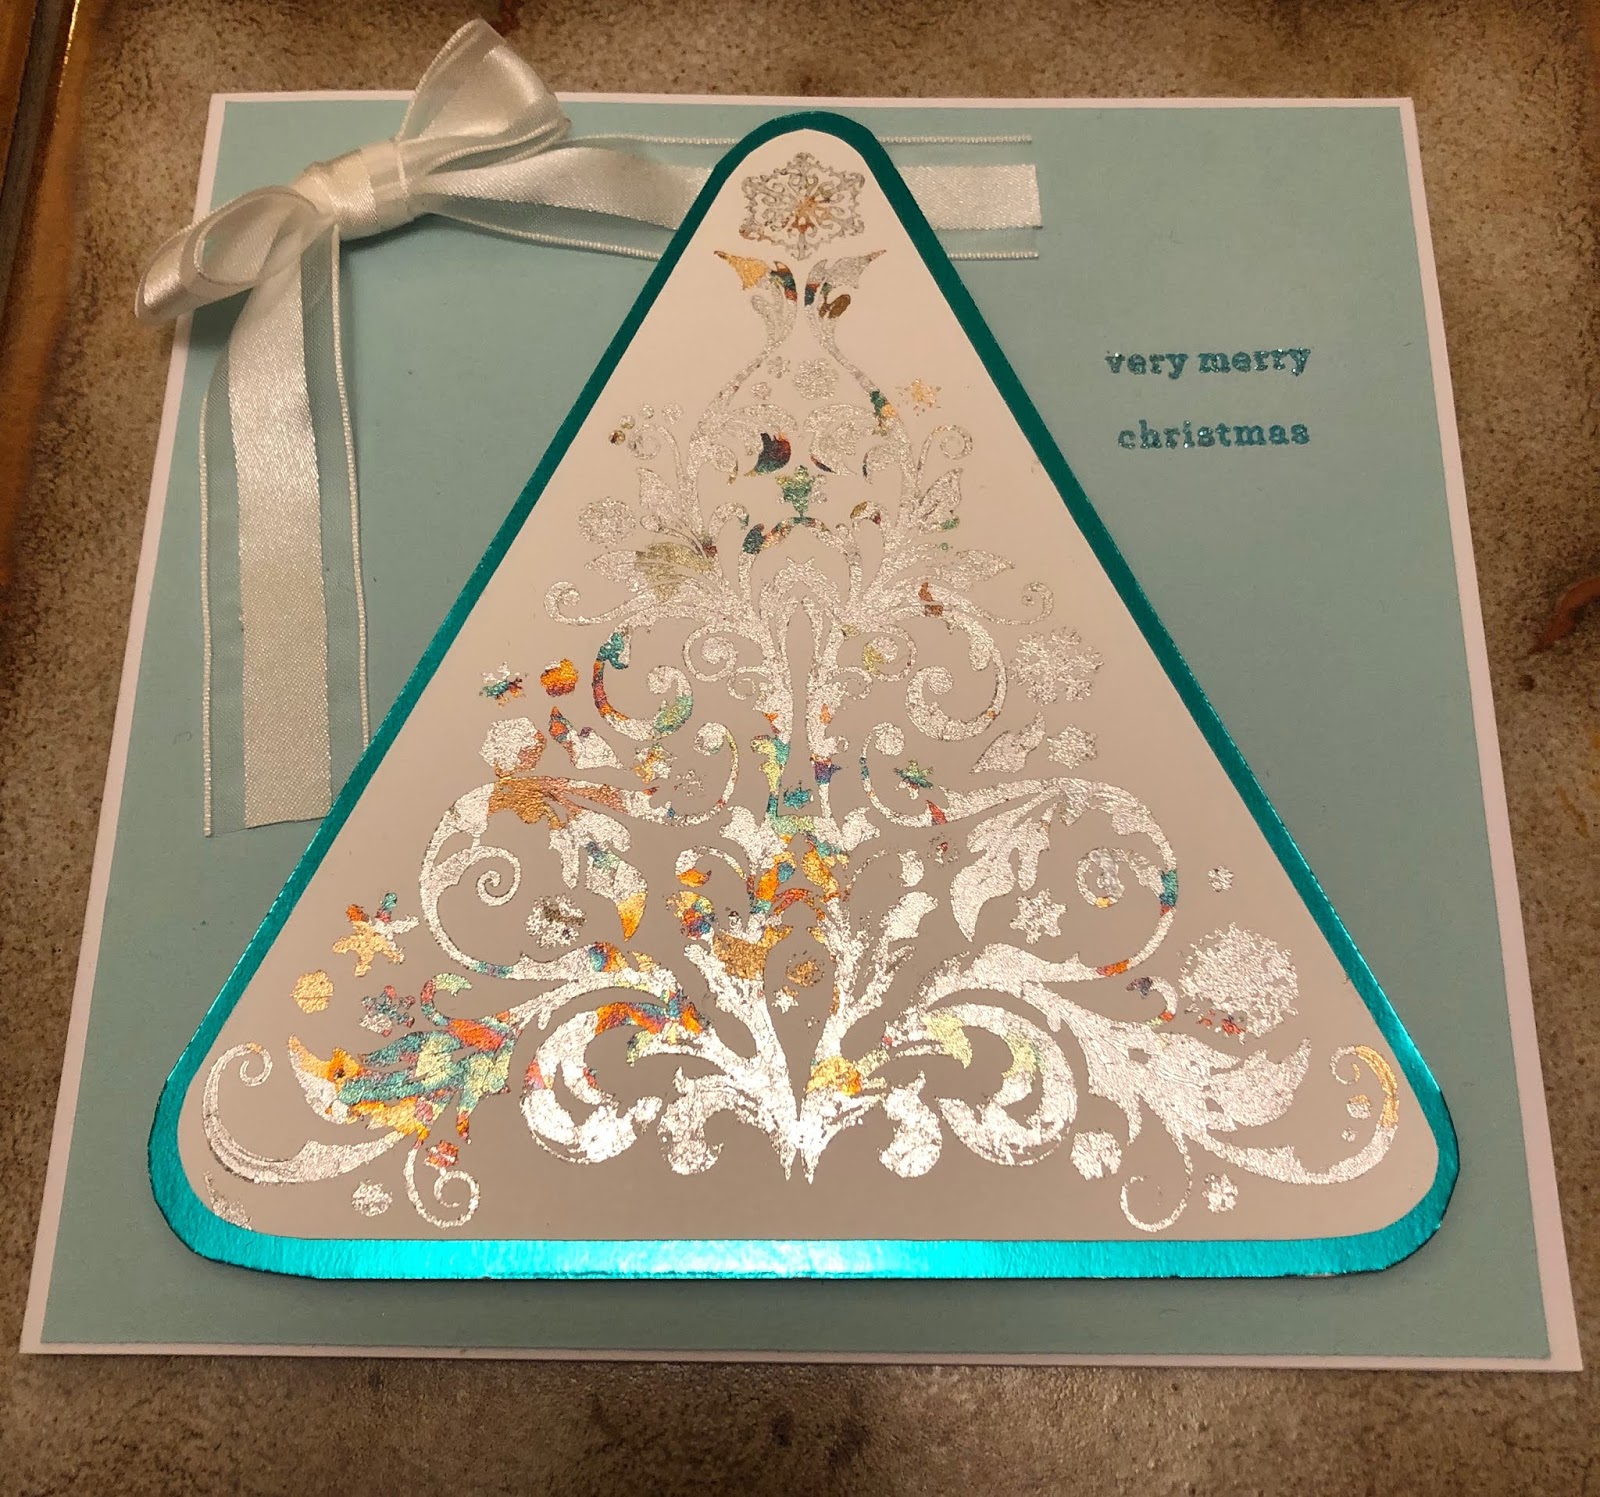
Ok so yes, I know it's now the 6th January and we are all taking our decorations down, but I inadvertently got so excited I gave these Christmas cards to the recipients without taking pictures of them. So I had to get my brother to take pictures of his and I took a picture of Mum's at hers when I visited for New Years. So excuse the fact they aren't the best pictures ever but I still wanted to show you them
My brother's one is below. I cut 4 pieces of black card and 4 pieces of music themed paper and rounded 2 of the corners on each piece.
I used my Stampin Up festive flurry stamp and die set again and got the gilding flakes out again as I love them so much.
I cut out a snowflake from gold card to go behind the gilded snowflake to make the image pop. I also stamped and gilded the sentiment too, which actually worked and it came out clear so it can still be read. Here is a picture of the sparkle in the flakes
The card below was for my Mum - again with the gilding flakes and Indigo Blu Baroque Christmas tree stamp.
I wasn't too sure how to cut this out so I opted for a triangle and mounted it onto some turquoise mirror card. I didn't want to add too much more decoration that would take away from the main tree so I just added a stain ribbon and a small heat embossed sentiment. I wasn't too sure about it but Mum loved it and that's what counts
Claire x
Showing posts with label christmas cards. Show all posts
Sunday, 6 January 2019
Friday, 28 December 2018
2018 Christmas Cards
So, it's been a while and I've not really had the inspiration to make cards for a while. We moved house in August and I've still been trying to find where I had hidden all my crafty bits and pieces. But I decided to root through all my old boxes and I think I also found my inspiration hiding in there
This year I made cards for close friends and family. One of the things I found was the Indigo Blu Flakes and Flitter glu and some of their lovely stamps. First up was this card I made for my boyfriend's mum. Now I can't tell you which of the flakes I used as I bought them over 4 years ago and tipped them into another container. The stamp is Festive Flurry from Stampin' up and is one of my Christmas faves
I used silver flakes for the large snowflake and gold flakes for the smaller snowflake. I then cut a medium snowflake from blue pearl card and used it to show off the colours in the other two images.
The sentiment is stamped and heat embossed with WOW! powder in Ruby Romance.
Now, I love heat embossing and I have far too many of the WOW! powders. And they certainly come out at Christmas. I love the fact you can add sparkle to a card without it going everywhere!
Another Stampin' Up favourite stamp of mine is Snow Day, where you can build a snowman. I made two of these cards this year and embossed them both in different WOW! powders. The first is Blue Blast which is one of my favourites and always comes out at Christmas in one form or another
The background was made using Indigo Blu's snowflakes stamp. It was stamped with Versamark and then I brushed over some blue pigment powder. In the right light it really shimmers
The next one was embossed using Sensational Sage - the pictures do not do this powder justice. It is a green and it has some amazing colours running through it that change colour depending on the light. I tried to capture it as best as I could but it just wasn't working
I did also make some other cards but I forgot to take pictures of them. I've asked the recipients if they can get pictures and then I will show you.
Claire
This year I made cards for close friends and family. One of the things I found was the Indigo Blu Flakes and Flitter glu and some of their lovely stamps. First up was this card I made for my boyfriend's mum. Now I can't tell you which of the flakes I used as I bought them over 4 years ago and tipped them into another container. The stamp is Festive Flurry from Stampin' up and is one of my Christmas faves
I used silver flakes for the large snowflake and gold flakes for the smaller snowflake. I then cut a medium snowflake from blue pearl card and used it to show off the colours in the other two images.
The sentiment is stamped and heat embossed with WOW! powder in Ruby Romance.
Now, I love heat embossing and I have far too many of the WOW! powders. And they certainly come out at Christmas. I love the fact you can add sparkle to a card without it going everywhere!
Another Stampin' Up favourite stamp of mine is Snow Day, where you can build a snowman. I made two of these cards this year and embossed them both in different WOW! powders. The first is Blue Blast which is one of my favourites and always comes out at Christmas in one form or another
The background was made using Indigo Blu's snowflakes stamp. It was stamped with Versamark and then I brushed over some blue pigment powder. In the right light it really shimmers
The next one was embossed using Sensational Sage - the pictures do not do this powder justice. It is a green and it has some amazing colours running through it that change colour depending on the light. I tried to capture it as best as I could but it just wasn't working
I did also make some other cards but I forgot to take pictures of them. I've asked the recipients if they can get pictures and then I will show you.
Claire
Thursday, 10 January 2013
New Year and Christmas Crafting
I know, I am probably the last person to write their New Year's blog post, but it's been quite a busy few weeks getting back into the swing of things.
Over Christmas I was very busy making presents for people.
The main present was a recipe book for my Mum, which I forgot to take pictures of so I can't post anything. I will need to try and take some next time I see her to show you. It featured 10 recipes from my childhood which me and my sister dug out of her recipe box and compiled into a fancy, decorated recipe book. She loved it.
I also made my mum a small cross stitch featuring a country cottage. It was a kit that she bought me to make, but I framed it in one of my Grandma's old embroidery hoops with some co-ordinating ribbon:
I also had to make a special Christmas card for my crafty friend and had seen an idea using Clarity stamps and shrink plastic.
My previous experience with shrink plastic wasn't great but it actually worked first time for this card. I die-cut the shrink plastic before I stamped it and then added a bit of colour. Instead of putting it in the oven, I heated it with my heat tool in a baking tray. This didn't work brilliantly and I think putting it in the oven would have been better.
For the background I had a brainwave as I couldn't find any backing paper that would match.
I stamped my snowflake stamp with versamark and embossed it with tinsel embossing powder. I then coloured the card with purple distress stain, leaving the embossed areas clear and visible.
I then layed purple ribbon across the card, segmenting it into 4. I layered up each bit of plastic onto gold card and stuck one in each segment. On the fourth segment I put a sentiment onto the gold card.
I have also listed all my jewellery on my Etsy shop. None of it has sold so far but lots of people have looked so fingers crossed someone will buy it soon!
That's all for now, time to get on with my projects for January. More posts soon.
Over Christmas I was very busy making presents for people.
The main present was a recipe book for my Mum, which I forgot to take pictures of so I can't post anything. I will need to try and take some next time I see her to show you. It featured 10 recipes from my childhood which me and my sister dug out of her recipe box and compiled into a fancy, decorated recipe book. She loved it.
I also made my mum a small cross stitch featuring a country cottage. It was a kit that she bought me to make, but I framed it in one of my Grandma's old embroidery hoops with some co-ordinating ribbon:
I also had to make a special Christmas card for my crafty friend and had seen an idea using Clarity stamps and shrink plastic.
My previous experience with shrink plastic wasn't great but it actually worked first time for this card. I die-cut the shrink plastic before I stamped it and then added a bit of colour. Instead of putting it in the oven, I heated it with my heat tool in a baking tray. This didn't work brilliantly and I think putting it in the oven would have been better.
For the background I had a brainwave as I couldn't find any backing paper that would match.
I stamped my snowflake stamp with versamark and embossed it with tinsel embossing powder. I then coloured the card with purple distress stain, leaving the embossed areas clear and visible.
I then layed purple ribbon across the card, segmenting it into 4. I layered up each bit of plastic onto gold card and stuck one in each segment. On the fourth segment I put a sentiment onto the gold card.
I have also listed all my jewellery on my Etsy shop. None of it has sold so far but lots of people have looked so fingers crossed someone will buy it soon!
That's all for now, time to get on with my projects for January. More posts soon.
Sunday, 2 December 2012
Personalised Items
After the craft show last month, I was asked to make a quilted baby blanket in the style of the cushions that were so popular at the show. I hadn't done this before but I was quite confident that it would look great - and it did!
I cut a piece of the patchwork material and layered it up with some wadding and light pink material, and machine quilted it in the check pattern. This was the easy part!
I bought some silky bias binding to edge it, which I hadn't used before and was a little bit tricky but I got there in the end:
For the corners, I did cheat slightly because I rounded them which made the binding a bit easier. The blanket was received very well and commented that 'it is better than anything you can buy in the shops' which is a great compliment! I'm hoping to get some more of this material so I can make a few more in the new year to sell.
I also had a request for a bespoke Christmas card. This was from someone who really likes my cards and wanted something special to give to her parents.
This card wasn't as easy as I first thought and I sat there on a Saturday for several hours wondering what I could do. I had to play around with the backing paper for ages, making sure it looked good.
The main image is a Christmas tree stamp from Indigo Blu which was heat embossed with white frantage embossing powder, to give the vintage glittery look:
Although I absolutely love embossing, I just can't find a good coloured gold embossing powder, so for the Mum and Dad lettering I had to paint the chipboard letters with gold acrylic paint, which had a similarly dazzling effect.
I did, however, emboss the Happy Christmas with bronze embossing powder - I couldn't resist!
The stars were the perfect finishing touch, embossed with the same white frantage powder which gives a different result every time. Although they turned out mainly white, they do have gold glittery effects mixed in too.
I hope they like it!
I cut a piece of the patchwork material and layered it up with some wadding and light pink material, and machine quilted it in the check pattern. This was the easy part!
I bought some silky bias binding to edge it, which I hadn't used before and was a little bit tricky but I got there in the end:
For the corners, I did cheat slightly because I rounded them which made the binding a bit easier. The blanket was received very well and commented that 'it is better than anything you can buy in the shops' which is a great compliment! I'm hoping to get some more of this material so I can make a few more in the new year to sell.
I also had a request for a bespoke Christmas card. This was from someone who really likes my cards and wanted something special to give to her parents.
This card wasn't as easy as I first thought and I sat there on a Saturday for several hours wondering what I could do. I had to play around with the backing paper for ages, making sure it looked good.
The main image is a Christmas tree stamp from Indigo Blu which was heat embossed with white frantage embossing powder, to give the vintage glittery look:
Although I absolutely love embossing, I just can't find a good coloured gold embossing powder, so for the Mum and Dad lettering I had to paint the chipboard letters with gold acrylic paint, which had a similarly dazzling effect.
I did, however, emboss the Happy Christmas with bronze embossing powder - I couldn't resist!
The stars were the perfect finishing touch, embossed with the same white frantage powder which gives a different result every time. Although they turned out mainly white, they do have gold glittery effects mixed in too.
I hope they like it!
Thursday, 5 July 2012
Heat embossing and Fran-tage
I recently came across the Fran-tage embossing enamels from Stampendous, and being the avid heat embosser that I am, I had to try them out.
These powders are made up of different fragments or various different sizes, which melt into different shapes when heated. There is also glitter in each pot and the enamels come in a range of colours.
The card below was made using a large chipboard flower which is inked with versamark ink and sprinkled on the powder. (sorry the picture hasn't come out too well). The powder used was shabby pink.
You can just about make out the gold flecks in the flower which creates a slightly aged look, and a finish that would not be achieved with normal embossing powders.
Below is another card that I made in the same way.
Because the chipboard was covered with the versamark ink before sprinkling on the powder, you get a thin coverage over the flower and the gold flecks aren't as prominent. For the centre of this flower I used the shabby white powder and didn't use any versamark ink.
After cutting out the circle, I sprinkled the circle with the powder and laid over some shaved ice flakes. Using tweezers to hold it and being careful not to burn myself, I heated the circle from behind. You need to do this from behind otherwise the powder and flakes just fly off. Once the powder starts melting you can then move to the front if you wish. The flakes use the molten powder to adhere to the card. This gave a contrasting, shiny centre to the flower.
After attending a heat embossing workshop, I learnt about the sprinkling technique and had an idea about using the white powder as snow. The below card illustrates my idea!
For this card I first of all stamped and embossed the snowman in ordinary white powder. I then used my mica powders to add a bit of shimmery colour to him.
Then I swiped my versamark ink pad along the bottom of the card and sprinkled a generous layer of the shabby white frantage powder so it stuck to the powder. I added some of the shaved ice flakes on top of the powder and heated from behind. Because of the amount of powder added, this really goes molten when heated and the flakes adhere nicely.
I then took a pinch of the embossing enamel and scattered it randomly over the top of the picture to create falling snow.
I love the shaved ice flakes with the powders and decided to make a sparkly girly card for a friends birthday:
For this card, I first of all I used my spun sugar distress stain to colour the card and then sponged some tattered rose distress ink around the edges. Then I randomly added pools of the shabby pink embossing powder with shaved ice flakes in each pool to give a nice sparkly background.
The large butterfly was made with fusible fibre and the petals were embossed onto vellum. The two blue butterflies were embossed onto acetate and adhered with clear glue dots.
I am planning on getting more of the frantage powders. I had a play with the aged black powder in the workshop, combining it with some gold mica flakes and this looked very effective. So watch this space for more projects using frantage!
These powders are made up of different fragments or various different sizes, which melt into different shapes when heated. There is also glitter in each pot and the enamels come in a range of colours.
The card below was made using a large chipboard flower which is inked with versamark ink and sprinkled on the powder. (sorry the picture hasn't come out too well). The powder used was shabby pink.
You can just about make out the gold flecks in the flower which creates a slightly aged look, and a finish that would not be achieved with normal embossing powders.
Below is another card that I made in the same way.
Because the chipboard was covered with the versamark ink before sprinkling on the powder, you get a thin coverage over the flower and the gold flecks aren't as prominent. For the centre of this flower I used the shabby white powder and didn't use any versamark ink.
After cutting out the circle, I sprinkled the circle with the powder and laid over some shaved ice flakes. Using tweezers to hold it and being careful not to burn myself, I heated the circle from behind. You need to do this from behind otherwise the powder and flakes just fly off. Once the powder starts melting you can then move to the front if you wish. The flakes use the molten powder to adhere to the card. This gave a contrasting, shiny centre to the flower.
After attending a heat embossing workshop, I learnt about the sprinkling technique and had an idea about using the white powder as snow. The below card illustrates my idea!
For this card I first of all stamped and embossed the snowman in ordinary white powder. I then used my mica powders to add a bit of shimmery colour to him.
Then I swiped my versamark ink pad along the bottom of the card and sprinkled a generous layer of the shabby white frantage powder so it stuck to the powder. I added some of the shaved ice flakes on top of the powder and heated from behind. Because of the amount of powder added, this really goes molten when heated and the flakes adhere nicely.
I then took a pinch of the embossing enamel and scattered it randomly over the top of the picture to create falling snow.
I love the shaved ice flakes with the powders and decided to make a sparkly girly card for a friends birthday:
For this card, I first of all I used my spun sugar distress stain to colour the card and then sponged some tattered rose distress ink around the edges. Then I randomly added pools of the shabby pink embossing powder with shaved ice flakes in each pool to give a nice sparkly background.
The large butterfly was made with fusible fibre and the petals were embossed onto vellum. The two blue butterflies were embossed onto acetate and adhered with clear glue dots.
I am planning on getting more of the frantage powders. I had a play with the aged black powder in the workshop, combining it with some gold mica flakes and this looked very effective. So watch this space for more projects using frantage!
Subscribe to:
Posts (Atom)