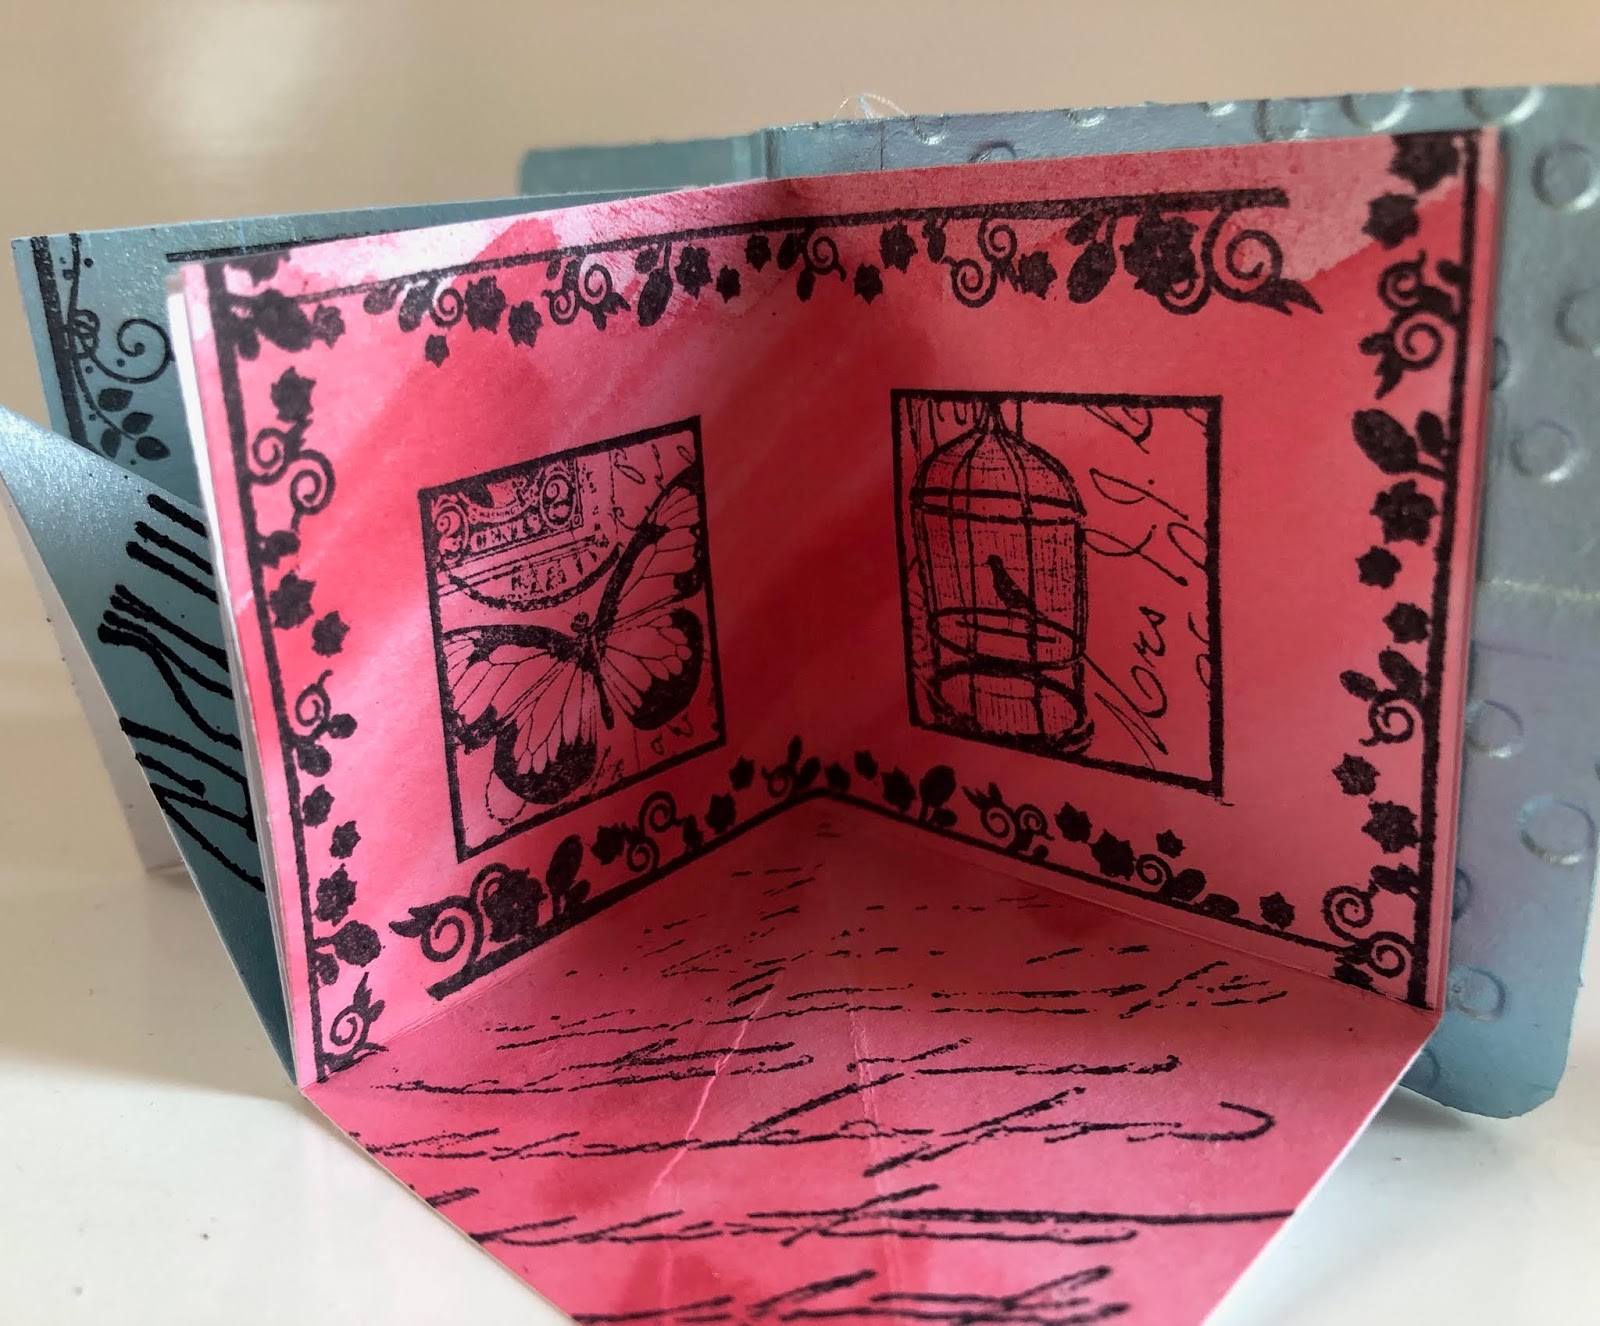
A few weeks ago, Tando Creative had these mini books on Hochanda and I knew the minute I saw them that I wanted them! They arrived just before Christmas and I've got so many ideas of how I want to decorate them.
First off though is this mini square book. It is about 2 inches square and has a separate spine that needs to be attached with masking tape, ribbon or material.
Covers -
Firstly I painted the covers with white acrylic to give it a good base. I then painted over this with a pearlescent blue acrylic paint. Then I ran it through the embossing folder, which I probably should have done first because some of the paint flaked off (I did just go over it again though)
Then I painted 2 chipboard flowers in the same shade of blue. I used my versamark pen around the edges and then heat embossed some blueberry powder onto it
For the ribbon, this was seam binding that I had from Stampin' Up. It's a cream colour but I used ink to colour it in pink to go with the theme of the book
I attached the spine on the outside with some pink ribbon I had. For extra security I used masking tape on the inside and painted over it.
The ribbon was attached both back and front with strong tape. Just remember not to pull it too tight around the book as it still needs to open!
Pages -
For the pages, I was inspired by a tutorial on the Hochanda show to make a pop out book that looks like the below:
I cut a square of paper that was 4" x 4" and then folded it in half then half again. I used a variety of inks and paints in the blue and pink shades to colour in the pages
I then used my Darkroom Door Garden Inchies stamps on the pages. They were the perfect size to add a stamped border around.
For the bottom page I used a mask and some Crafty Individuals stamps that I had forgotten about
The page below I used the same blue pearl paint mixed with water so it wasn't so thick. I then used WOW! powder in black glint, which gives it a very subtle shine to the images. The images are also much bolder than the ones stamped with regular ink.
Although it's not perfect, I loved making this book and I can't wait to make the other 10 that I have. There is also a little shelf for them all to sit on, which I will have to show you at a later date.
Claire x
Showing posts with label WOW embossing powder. Show all posts
Saturday, 29 December 2018
Friday, 28 September 2012
Stamping onto Candles
I first heard about this technique from a friend and when I become stuck what to make my Mum for mothers day I decided to give it a go. The results where brilliant (if I say so myself) so I thought I would try it again and experiment with heat embossing - my favourite!
I also thought I would share a quick tutorial with you as well.
Here is one of the candles that I heat embossed with blue glitter WOW powder. The picture doesn't show the sparkle very well.
What you will need:
A white candle, some white tissue paper, embossing powder, heat gun, talcum powder to stop the static, a large and a small paintbrush, a stamp of your choice and versamark ink.
Instructions:
1) Cut a piece of the tissue paper to the right size to cover the candle. You will be wrapping this around the candle and you don't want any overlap.
2) Brush some of the talcum powder onto the tissue paper using the large paintbrush and tip off any excess.
3) Ink up your stamp with the versamark ink and stamp it onto the tissue paper, pressing fairly hard to make sure all the image comes out. Then carefully take the stamp off being careful not to tear the tissue.
4) Before the ink dries, pour the embossing powder over the stamped image and return the excess to the pot. The heat the image until all the powder is melted. Repeat this as necessary - with the snowflake candle I stamped my image twice which was enough to cover the candle.
5) When you have your image ready, cover the back of it with a small amount of Pritt Stick and wrap around the candle. This keeps the image from moving when heating.
6) Some people prefer to use baking parchment when heating - wrap this around the candle and heat through it, however I didn't use this. Apply the heat gun to the image on the candle, being careful not to heat the wax too much. You can see through the tissue paper and easily identify when it is melted to the candle because it becomes more see through.
The key is not to heat the wax too much and do it in small sections. I heat a bit and then rub it over with my fingers to make sure it's stuck down and it's smooth. This does mean I get covered in wax but once it's dry it easily peels off!
Some of the edges might be harder to stick down, so if you do find they are curling, apply a little bit more of the pritt stick and heat again, smoothing the tissue down with your finger immediately after removing the heat.
Then you have your finished candle. Here are some more that I made now I've got the hang of it:
The two on the outside are both heat embossed and the butterfly ones in the middle are just coloured images using pro markers before the tissue is heated onto the candle. After heating I then applied some stickles glitter glue to the image.
This technique did require a lot of practice so before going for the best one, buy some cheap candles that you can practice with. They make great presents. I have wrapped mine in cellophane and tied with ribbon and added a small tag to them:
I also thought I would share a quick tutorial with you as well.
Here is one of the candles that I heat embossed with blue glitter WOW powder. The picture doesn't show the sparkle very well.
What you will need:
A white candle, some white tissue paper, embossing powder, heat gun, talcum powder to stop the static, a large and a small paintbrush, a stamp of your choice and versamark ink.
Instructions:
1) Cut a piece of the tissue paper to the right size to cover the candle. You will be wrapping this around the candle and you don't want any overlap.
2) Brush some of the talcum powder onto the tissue paper using the large paintbrush and tip off any excess.
3) Ink up your stamp with the versamark ink and stamp it onto the tissue paper, pressing fairly hard to make sure all the image comes out. Then carefully take the stamp off being careful not to tear the tissue.
4) Before the ink dries, pour the embossing powder over the stamped image and return the excess to the pot. The heat the image until all the powder is melted. Repeat this as necessary - with the snowflake candle I stamped my image twice which was enough to cover the candle.
5) When you have your image ready, cover the back of it with a small amount of Pritt Stick and wrap around the candle. This keeps the image from moving when heating.
6) Some people prefer to use baking parchment when heating - wrap this around the candle and heat through it, however I didn't use this. Apply the heat gun to the image on the candle, being careful not to heat the wax too much. You can see through the tissue paper and easily identify when it is melted to the candle because it becomes more see through.
The key is not to heat the wax too much and do it in small sections. I heat a bit and then rub it over with my fingers to make sure it's stuck down and it's smooth. This does mean I get covered in wax but once it's dry it easily peels off!
Some of the edges might be harder to stick down, so if you do find they are curling, apply a little bit more of the pritt stick and heat again, smoothing the tissue down with your finger immediately after removing the heat.
Then you have your finished candle. Here are some more that I made now I've got the hang of it:
The two on the outside are both heat embossed and the butterfly ones in the middle are just coloured images using pro markers before the tissue is heated onto the candle. After heating I then applied some stickles glitter glue to the image.
This technique did require a lot of practice so before going for the best one, buy some cheap candles that you can practice with. They make great presents. I have wrapped mine in cellophane and tied with ribbon and added a small tag to them:
Wednesday, 26 September 2012
Journal of my Life
I was thinking of another book to make and decided to look for some ideas on the Sweet Shoppe Designs website. I had previously downloaded a digital scrapbooking kit from here so I thought I would have another look to see what's new when I came across the Journal of my Life scrapbook kit.
I immediately fell in love with the colours used and downloaded it to use. The kit comprises of a number of papers, elements and alphabets and because it's a downloadable pack you can print off and re-size the pieces you want to use.
I chose an 8x8 book because it leaves enough space to add both photos and embellishments. I bound it using the Zutter Bind it All machine because it makes a very sturdy book and looks professional.
The Love and Life were cut out from the kit and glittered using stickles glitter glue. I stuck a piece of white lace along the bottom with double sided tape and then die cut a heart from chipboard. Then, using the frantage embossing powder in shabby pink and some shaved ice, I embossed the heart and stuck it over the lace.
The circular butterfly element was embossed onto black card using WOW violet pearl powder and mounted onto a scalloped circle coloured with distress ink. The yellow card candy was made using some kraft card candy and embossed with yellow WOW powder.
The inside of the book has individually decorated pages that have enough room to put pictures on them and to add your own embellishments.
This is the first page and I have made a frame out of ribbon. I cut 4 strips of ribbon to the same length and trimmed the ends diagonally. I then put double sided tape onto each strip and layered them over each other, ready for a picture to be added.
The turquoise paper on the right is my favourite and I felt that I didn't want to add too much to these pages. A journalling element was added to the left hand page to record details of the pictures added.
This one is another of my favourite papers - the journal page. I wasn't sure what I could add to this page so just a butterfly with some glitter added. On the right hand page I die cut another chipboard heart but this time I embossed with blue lagoon WOW powder, punched a hole in it and threaded through some twine.
The paper on the left hand side of the above is a replicate of some newspaper, which I love. I really couldn't find an element that would go with this paper so I left it blank and complimented it with some purple wood effect paper opposite, finished with a tag.
And the last page I'm going to show you is this one. The left hand page features a tag and a felt circle replicated element that was part of the kit. I have glittered the flower detailing and will put a small silver gem in the middle of it.
On the right hand side I have added another journalling tag as well as some butterflies that were heat embossed with WOW powder in pomegranate.
As you can see, there is still plenty of room to add your own personal touch to this book and I have created the pages so that they all co-ordinate and there is lots of colour.
Part of me doesn't want to sell this book but the good thing about it is that if I do sell it, I can always make another one!
I immediately fell in love with the colours used and downloaded it to use. The kit comprises of a number of papers, elements and alphabets and because it's a downloadable pack you can print off and re-size the pieces you want to use.
I chose an 8x8 book because it leaves enough space to add both photos and embellishments. I bound it using the Zutter Bind it All machine because it makes a very sturdy book and looks professional.
The Love and Life were cut out from the kit and glittered using stickles glitter glue. I stuck a piece of white lace along the bottom with double sided tape and then die cut a heart from chipboard. Then, using the frantage embossing powder in shabby pink and some shaved ice, I embossed the heart and stuck it over the lace.
The circular butterfly element was embossed onto black card using WOW violet pearl powder and mounted onto a scalloped circle coloured with distress ink. The yellow card candy was made using some kraft card candy and embossed with yellow WOW powder.
The inside of the book has individually decorated pages that have enough room to put pictures on them and to add your own embellishments.
This is the first page and I have made a frame out of ribbon. I cut 4 strips of ribbon to the same length and trimmed the ends diagonally. I then put double sided tape onto each strip and layered them over each other, ready for a picture to be added.
The turquoise paper on the right is my favourite and I felt that I didn't want to add too much to these pages. A journalling element was added to the left hand page to record details of the pictures added.
This one is another of my favourite papers - the journal page. I wasn't sure what I could add to this page so just a butterfly with some glitter added. On the right hand page I die cut another chipboard heart but this time I embossed with blue lagoon WOW powder, punched a hole in it and threaded through some twine.
The paper on the left hand side of the above is a replicate of some newspaper, which I love. I really couldn't find an element that would go with this paper so I left it blank and complimented it with some purple wood effect paper opposite, finished with a tag.
And the last page I'm going to show you is this one. The left hand page features a tag and a felt circle replicated element that was part of the kit. I have glittered the flower detailing and will put a small silver gem in the middle of it.
On the right hand side I have added another journalling tag as well as some butterflies that were heat embossed with WOW powder in pomegranate.
As you can see, there is still plenty of room to add your own personal touch to this book and I have created the pages so that they all co-ordinate and there is lots of colour.
Part of me doesn't want to sell this book but the good thing about it is that if I do sell it, I can always make another one!
Friday, 21 September 2012
Recipe Book
I had the idea to make a recipe book several months ago and have been collecting some stamps and elements that I could use for the book. I found the 'From the Kitchen' set of stamps by Darkroom Door which I thought would fit my theme perfectly.
My Mum has a box full of scrappy pieces of paper with recipes written on them which I am planning on putting into this book one day. I need to get my hands on them first and choose my favourite 10 to put in here.
I think the book has a vintage feel to it and I have created 10 unique pages in which recipes can be added.
The cover features a glittered kitchen themed topper which has been mounted onto brown glitter paper. The 'recipes' wording has been heat embossed in Pomegranate WOW embossing powder on cream card. The heart was die cut out of chipboard and then embossed with the same powder and hung from under the circle using some pink glittery DMC thread.
The contents page looks a bit bare at the moment but I'm not sure what is needed to make it more exciting. Perhaps it will look better when it's full of lovely recipes.
Each recipe has 2 pages allocated to it - one to write down all the ingredients and the other to write down the directions. Each set of pages has been covered in co-ordinating papers and embellished with kitchen themed elements. There is plenty of space to add more elements if required.
Each page is slightly different and all are a different colour. Here are a selection of the pages in the book:
And then I had a page left over at the back which I wasn't sure what to do with so I used it as a notes page where you can scribble down anything that you might not have had room for, or need to remember about a recipe from that scrappy piece of paper!
I hope Mum will like it when it's full of recipes. I think it looks too nice to write in - must remember to use my best handwriting!
My Mum has a box full of scrappy pieces of paper with recipes written on them which I am planning on putting into this book one day. I need to get my hands on them first and choose my favourite 10 to put in here.
I think the book has a vintage feel to it and I have created 10 unique pages in which recipes can be added.
The cover features a glittered kitchen themed topper which has been mounted onto brown glitter paper. The 'recipes' wording has been heat embossed in Pomegranate WOW embossing powder on cream card. The heart was die cut out of chipboard and then embossed with the same powder and hung from under the circle using some pink glittery DMC thread.
The contents page looks a bit bare at the moment but I'm not sure what is needed to make it more exciting. Perhaps it will look better when it's full of lovely recipes.
Each recipe has 2 pages allocated to it - one to write down all the ingredients and the other to write down the directions. Each set of pages has been covered in co-ordinating papers and embellished with kitchen themed elements. There is plenty of space to add more elements if required.
Each page is slightly different and all are a different colour. Here are a selection of the pages in the book:
And then I had a page left over at the back which I wasn't sure what to do with so I used it as a notes page where you can scribble down anything that you might not have had room for, or need to remember about a recipe from that scrappy piece of paper!
I hope Mum will like it when it's full of recipes. I think it looks too nice to write in - must remember to use my best handwriting!
Thursday, 12 April 2012
Handmade Writers Notebook
I had some stamps which lent themselves nicely to make this book:
I took two pieces of sturdy cardboard for the covers and stamped the script stamp in brown ink onto cream card. I then wrapped these around the covers and finished off the inside cover with some cream card.
The inside has lined paper from a pad so I lined the ready punched holes up and punched matching holes into the covers. I fixed in some bronze brads and book rings hold it all together.
For the front decoration I heat embossed the typewriter image in pomegranate WOW embossing powder. This image was then mounted onto brown card.
The words were stamped onto mountboard with matching red ink and ultra thick embossing powder was applied three times to give it the raised, shiny finish.
A different script stamp was stamped 3 times and embossed with the same pomegranate embossing powder onto the cream card. This was cut out and mounted onto brown card as a border.
The small book was stamped with clear versamark ink onto brown card and embossed with WOW embossing powder in copper metallic.
This would make a perfect present for any writer and you won't find anything like it!
I took two pieces of sturdy cardboard for the covers and stamped the script stamp in brown ink onto cream card. I then wrapped these around the covers and finished off the inside cover with some cream card.
The inside has lined paper from a pad so I lined the ready punched holes up and punched matching holes into the covers. I fixed in some bronze brads and book rings hold it all together.
For the front decoration I heat embossed the typewriter image in pomegranate WOW embossing powder. This image was then mounted onto brown card.
The words were stamped onto mountboard with matching red ink and ultra thick embossing powder was applied three times to give it the raised, shiny finish.
A different script stamp was stamped 3 times and embossed with the same pomegranate embossing powder onto the cream card. This was cut out and mounted onto brown card as a border.
The small book was stamped with clear versamark ink onto brown card and embossed with WOW embossing powder in copper metallic.
This would make a perfect present for any writer and you won't find anything like it!
Subscribe to:
Posts (Atom)